Recording Drums At Home: The Delay Trick – 1 Fun Trick To Improve Your Drum Recordings

Recording Drums At Home: The Delay Trick

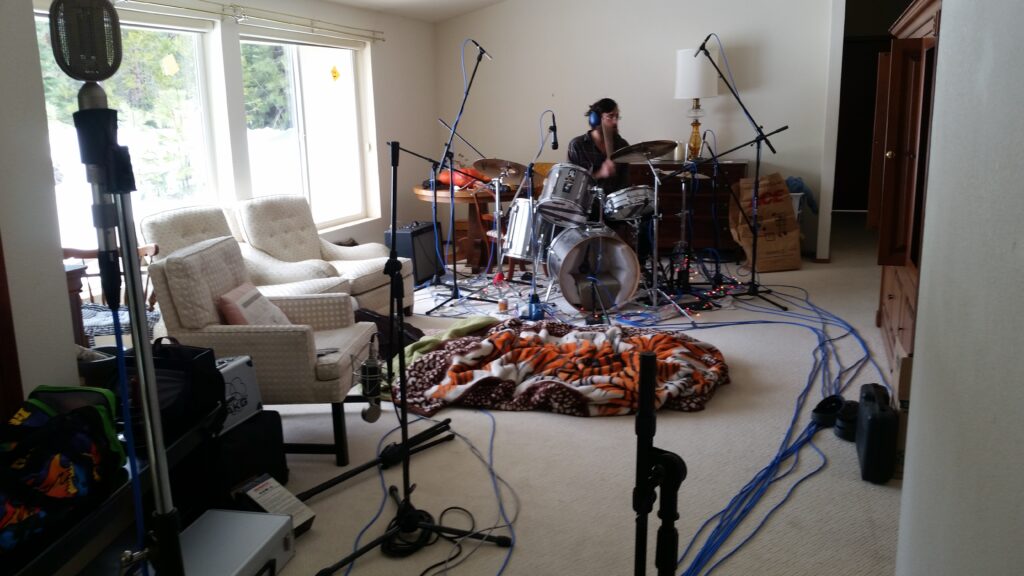
Sometimes, you have to record in situations that just aren’t ideal. Maybe you’re just getting started, recording bands in your basement, or recording your own band in your living room. Or in one fun case for me, bringing your nice gear out to a nice beach house to record some music away from the rest of the world. That was a fun few days!

While you absolutely can get a good quality recording in these kinds of spaces, it can be challenging. There will almost certainly be noise, little to no room treatment, neighbors who will hate you, time constraints to try to appease said neighbors. Recording in a nice studio with a control room and an engineer who knows the room and the equipment makes everything go so much smoother!

home drum recording

The Struggle

One such struggle I found was with recording drums. In an ideal world, you’d be in a nice studio, the mics roughly positioned in front of the kit, everything running through a nice board and outboard gear, and an assistant engineer to help you. You could listen to the drummer playing from the control room, while asking the 2nd engineer to move mics around in the studio, dialing in the perfect drum sound. And of course, taking notes in your track sheet so you can dial in that great tone the next time you’re in that studio.

But this article isn’t about that. No, this is for the band recording in their friends living room for the weekend. For the engineer trying to get their start recording drums in their parents' basement. Or for the seasoned pro with a nice remote recording rig looking for another trick.

My old approach was to set up my mics where I thought they would sound good. Then record a little bit, listen back, and decide I hated something, or worse, everything. Then I'd adjust mic positions and repeat until things sounded good enough. This would take a long time and would eat into our limited time for recording. And like lots of people just starting out, I ended up not being too thrilled with the sound later. Part of this was due to losing perspective, which deserves another article itself (reference tracks!). Another part was not being able to properly, and quickly, hear what my mic position changes were doing.

The Delay Trick:

That’s when I thought of a fun little trick. I placed a delay plugin on my drum bus, set it to 100% wet, and gave it a 2 second delay. Then, while the drummer and I were both wearing headphones, I’d then tell him to hit the snare once, for example. We’d hear it in the room, obviously. Then 2 seconds later in our headphones, we’d hear what the mics were picking up. This allowed me to quickly hear what the mics were hearing and allow me to make changes. Then hear the changes, and repeat until I was satisfied. Plus the drummer would then have fun playing with the delay for a bit, this is supposed to be fun, remember?

Trying to make adjustments in the room with headphones without the delay would never work right for me. I’d hear too much of the natural sound of the drums in front of me to hear what the mics were picking up in my headphones. But this little trick helped me start dialing in my drum tones much quicker than before. And I was happier with how they turned out in the end!

I hope this trick helps you start improving your drum recordings, just like it helped me. I’m planning on writing more articles on recording drums and maybe recording in general. So if you’re interested in reading those when they’re released, you can sign up for my mailing list below.

Hope to hear about your music soon!

Jon

thedrumeditor.com

Start Improving Your Drum Recording

About The Author

Hi! I'm Jon Lesher, a sound engineer in the San Francisco Bay Area. I got my start playing guitar with friends and playing in bands and I wanted to record what we were making. From there, I fell in love with music production, got a degree in recording arts in 2005, and started working in studios. I mostly do editing and mixing these days, but love sharing what I learned about recording to help my fellow musicians make better recordings! If you'd like to learn more about me, go to jonlesher.com.

Studio Track Sheet – One of the best ways to improve your recordings

Studio Track Sheet: The Best Way To Improve Your Recordings

Getting a great sounding drum recording is one of the most difficult things to accomplish in the recording studio. The artist, music producer, and sound engineer have so much to think about. There's drum selection, placement in the room, proper room treatment, drum mic selection, mic placement, phase relationships, preamp choice and settings, whether to record with compression or any other processing, what settings to use on those, do you use a click track, how loud is the headphone mix for the drummer, should you tell them to hit the cymbals a little softer, the variables are endless! And that's just on the recording side for one song. What if that setup doesn't sound great on another type of song?

This isn't a post about what to do about any of these things. You can check out the first part of my drum recording guide here if that's what you need. I intend to write some more in the near future, and will update this post when I do, but the truth is the internet is full of different approaches and opinions. What works for one person may not work for another. The fun part about being a sound engineer is taking the time to experiment and find what does work for you.

Enter The Recording Studio Track Sheet:

track sheet

For decades, recording studios have used a track sheet when running recording sessions. They're an excellent way to not only help keep things organized, but to also give you the ability to quickly recall your exact settings, mic placements, selections, and whatever else you include in the notes on your sheet. The more details you include, the better!

So if you record some drums for a song and decide you didn't like how the snare sounded by the time you get to the mixing stage, you can refer back to the track sheet on your next session and make adjustments. Or if you really liked the kick sound you got, you can now duplicate what you did on all future sessions. All you have to do is just look at your sheet and copy your settings.

There's a saying, "what gets measured gets managed." So the best way to improve your recordings, is to do a recording and write down what you did. Then you can learn from mistakes and build on your successes.

I've made my own studio track sheet here and would like to share it with you. Just let me know where to email it and it's all yours. I'm including a google sheets version of it that you can make copies of and keep with your session files. I'm also including a pdf version for those of you who prefer to have physical copies you can write on. I hope this helps you get some great recordings! Then when it's time to edit your drums, send me a message and I'll help you make your drums shine!

Start Improving Your Drum Recording With A Track Sheet!

About The Author

Hi! I'm Jon Lesher, a sound engineer in the San Francisco Bay Area. I got my start playing guitar with friends and playing in bands and I wanted to record what we were making. From there, I fell in love with music production, got a degree in recording arts in 2005 , and started working in studios. I mostly do editing and mixing these days, but love sharing what I learned about recording to help my fellow musicians make better recordings! If you'd like to learn more about me, go to jonlesher.com.

Scroll to top