How To Make Your Bass Drum Sound Better In 8 Steps

How To Make Your Bass Drum Sound Better

bass drum sound

*As an Amazon Associate I earn from qualifying purchases from some links in this article. But I only recommend things I use and/or believe in.

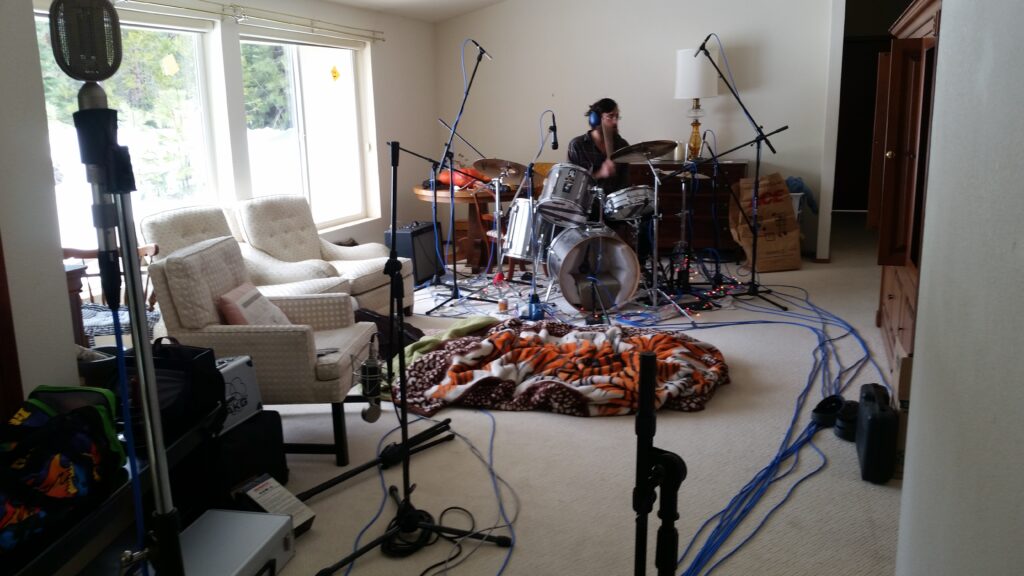
Hi, welcome to the first article in my guide to recording better drums at home or in the studio. As a professional sound engineer and audio editor, I listen to drums for countless hours every week. A lot of the drums I hear are great and everyone’s happy with how they sound. But some of the musicians I’ve worked with, particularly those who record themselves at home, have asked me for advice on how to improve their drum sound. The most prominent parts of the drum kit more often than not are the bass drum, or kick drum, and the snare. Getting those two elements to shine is going to be particularly important to your drum sound. We’ll get started with your bass drum sound.

So this article will be focusing on kick drum first, then I’ll be following this up with another article on the snare. I’m also putting together a guide for recording the whole kit. I’ll be updating this article once it’s complete. If you’re interested in being updated on that, scroll to the bottom of the page and sign up for my email list. I’ll let you know when it’s done! In this article, I’ll be talking about the following:

8 Steps For Recording A Bass Drum

  1. Considering the context of the song you’re recording.

  2. The room your drums are set up in.

  3. Drum selection

  4. Drum heads

  5. Tuning

  6. Dampening

  7. Mic selection

  8. Mic placement

So get comfy and let’s work on making that bass drum sound better!

Context

Think of the style of music you’ll be recording. Listen to some similar songs that you like the drum sound and pay attention to the drums. Are you recording metal and the drums are very tight, punchy and in your face? Or is it a slower, sparse blues song and the drums sound round, full, and taking up a lot of space? This will dictate how you’re going to approach micing up your drums. Do you want a tight, punchy kick drum, you might need a mic inside the drum right up on the beater to get more attack. More of a fat low end pulse for that bass drum? You may just explore micing on the outside of the kick near the resonant head. (We’ll get more into mic techniques later.)

An excellent tool for those of you recording in DAW’s is a plugin called Metric AB from Adptr Audio. You can load in several reference tracks that have the type of drum sound you want to achieve and volume match them with your own recording. It’s a great way to help keep yourself on track with dialing in your bass drum sound. Keeping that context in mind is huge, especially when you’re new to recording.


The Room

The room you’re recording in has an enormous impact on the sound of your drum recordings. If you’re in a home recording studio type environment, it can take some work to get the room sounding good. Homes aren’t built with recording music in mind. There’s external noise like traffic outside, or other people in the building going about their days. There’s also the issue with how the room itself sounds. Most rooms in homes are rectangular, and parallel walls (and floor and ceiling!) can cause all kinds of weird problems when it comes to recording. If you have the luxury of choosing the space you record in, I’d first encourage you to look into recording in a proper studio if you can afford it. Just google “recording studio near me” and do a little research.

If you want to record elsewhere, try to use a room that isn’t a cube, and that doesn’t have obvious acoustic problems. Loudly clap in the room and just listen to the reverb, or echo. Walk around clapping and listening, you might find that rooms with very reflective parallel surfaces can make weird sounds, those can be a problem. Not impossible, but can be a pain to fix. If you don’t have a room that doesn’t have obvious problems, or if you just only have one room available to you, then just try to set up your drums in the area of the room that sounds the least reflective. Odds are, in a home recording environment, you’re going to want to record in as dead of a place as possible. Unless you have something like a large wooden living room where the reverb actually might sound good to you.

My room sucks, what do I do?

If your room is going to be a problem, either too much noise, or too reverb-y (that’s a word, right?), there are treatments you can do to your room. Your best option is to use broadband acoustic treatment panels, most commonly made from fiberglass panels. They’re cheap and easy to DIY, or they’re available to buy pre-built. And they do a great job, much better than any foam products that are out there. There’s a good amount of information out there on acoustic treatment. I’ve learned some things, but won’t claim to be an expert. If you’re going with the “use what you’ve got” approach, you can experiment with putting absorbent material on at least one of the parallel walls where you’re noticing problems. Thick blankets, moving blankets, couch cushions, mattress, whatever you can get. It won’t be perfect, but it could help reduce the room sound in your recordings.

Why am I going on about the room? Because room mics and overhead mics do a lot for the overall drum sound, not just the close mics! So it’s important to spend at least a little time working on the room itself.

Experiment with the placement of your drums in the room if you can. You can move just one of the drums around the room (a floor tom works well for this) and hit it in a bunch of spots in the room and just listen to how things sound.


Dialing In Your Bass Drum Sound

Drum Selection

Now that you have the context in mind, we move on to making your bass drum have the sound you’re after. First, if you have the luxury of having multiple kick drums at your disposal, give them each a listen. See if one sounds closer to the sound you have in mind for the song. Listen to how they sound in the room by themselves, and listen to how they sound once you’ve set up your drum mics. You may be surprised which drum you end up preferring!


Drum Heads

When’s the last time you changed drum heads? Or thought about how they change the sound of your bass drum? Well while researching things for this article, I stumbled on this video by Roy Cox comparing 30 different batter heads. Frankly, I think it’s an excellent video showing the differences between a ton of different bass drum heads. Put on some good headphones and give it a watch later. Compare his various kick drum sounds to your own and see if changing heads is right for you. It may help you chase down your perfect tone! Take note on how the bass drum sound changes when listening to each kick mic by itself and when it’s combined with all the other mics on his kit. We’ll talk about that later!

For what it’s worth, after watching his video, I definitely found some I liked more than others. Evans drum heads: Evans EQ2 Clear, Evans EQ4 Clear.  Remo drum heads: Remo Powerstroke 3 Clear, Remo Pinstripe Clear, and Remo Emperor clear. Aquarian drum heads: Aquarian Force I Coated, Aquarian Superkick I Clear. But that’s all subject to change based on the context of the music you’re recording and personal taste. And since we’re talking about drum heads…

Tuning Drums

When’s the last time you grabbed your drum key and tuned your drums? There’s no one right way to tune your bass drum. This is all based on what sounds right to you. But if you haven’t experimented with different tunings, you should take the time. Listen to how your bass drum is currently tuned, and compare it to how it sounds in recordings of similar styles of music. Is the pitch of your drum lower or higher than your reference track? Does yours sound tighter, or a little flabby in comparison? Experiment with how the sound changes with tightening and loosening both the batter head and the resonant head. Some drummers will even tune their drums to the key of the songs they’re recording! If you find tuning by ear difficult, there are drum tuners out there that you can try as well.

Dampening

Drum dampening is when you put something on the drum head to reduce the amount of time it vibrates after hitting it. Think about the context of your drums in the music you’re recording (I’m going to keep bringing this up, you’re just going to have to deal with it!). Are you recording drums for metal that you want to sound like they’re punching you in the chest? Odds are, the kick drum involved has a lot of dampening going on.

The style you’re playing in will dictate how much you want to dampen your bass drum. This can be done on the cheap by just stuffing it with pillows, blankets, or towels. Or you can prop up pillows or towels against the resonant head with something heavy holding it in place. Or good ol moongels (a good friend of mine bought a bunch of sticky hands instead of moongels, kind of a fun alternative!). The evans eq pad is another example of something you can use inside your kick. I like the examples I’ve heard, and it seems reasonably priced. You probably don’t want to completely deaden either head of your bass drum, you’ll still want some of the tone you’ve worked so hard for so far. It’s just a matter of dialing in the decay of the drum sound to match the style of your music (context!).

Mic Selection

Alright, 1600 something words into this article and we’re finally getting to the drum mics! So first we’ll talk about what bass drum mics are out there and which ones I think you should be looking at. Then we’ll get into some mic techniques.

The bass drum is one of the most important bass or low frequency sounds in modern music along with bass guitar. So most of the kick drum mics that are on the market will have a boost in the lower frequencies, a cut in some of the lower mid frequencies that can sound kind of boxy, and can withstand the loud, percussive sounds of a drum kit. As long as you work to clean up the sound of your bass drum using the previous techniques we touched on and use good mic techniques, these mics should do a great job at capturing your sound. They should sound clean and with a powerful low-end punch without needing much eq and compression in the mix.

What is the best kick drum mic?

Good luck asking that question and getting a straight answer. Ask “what is the best ___ mic?” on any forum or social media post and dozens of musicians and engineers will tell you dozens of different answers. Some get mentioned more than others, but they may not be the right answer for you and your music (context!). So why ask the question here? Why give you some options anyway? Because I’m assuming you were curious, and I may as well give you some good options. You can listen to some examples online and see how you like each one. But I like these 3 mics. I own 2 of them and will probably buy the third one eventually, so you know I’ve put my money where my mouth is!
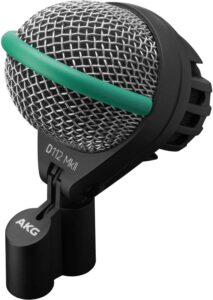
AKG D12 VR

While researching for this article, I listened to a ton of mic samples to make sure I wasn’t missing any mics and I really liked the sound of this one. Which isn’t surprising since it’s also one of the pricier options out there. I find I have expensive tastes at times. The examples I heard had a great low-end thump to them, no boxy sound, and a pretty good, but not overbearing click of the beater hitting the batter head. Just a really clean sounding bass drum. Worth a listen if you’re looking to spend that much. And in my experience, AKG microphones are durable and rarely have any issues if you take good care of them.
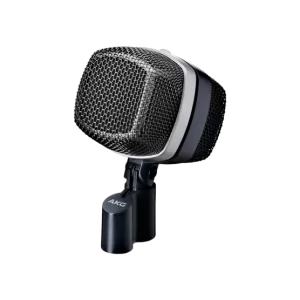
AKG D12 VR, best bass drum sound

AKG D112

I own this one. It’s long been one of the standard kick drum mic options you’ll find in a lot of recording studios. I often place it inside the kick drum close to the batter head to get a good, satisfying attack from the beater. Then I’ll use another mic on the resonant head to get more low end and blend the two mics together. But the D112 can get a very good sound all on its own if need be. It’s a lot more attractive to those of you on a tighter budget than the D12 VR and my favorite at this price.
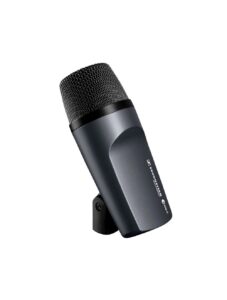
AKG d112 2nd best bass drum sound

Sennheiser e602

I also own this one. This one is probably more for those of you who want more low end in your kick. I basically only use this one these days on the outside of the kick near the resonant head. It gets a great low end thump. So if that’s more the sound you’re looking for, this is the one for you. It sounds ok inside the bass drum as well, but it’s not what I feel it excels at. As a bonus, I think it sounds pretty good on a bass guitar amp too. This is probably the best sounding mic you’ll find in that price range.

Sennheiser E602, 3rd best bass drum sound

Honorable mention:

These mics are well liked and can certainly get you a professional sound, they just aren’t my favorites. But that doesn’t mean you won’t like them, you should look into several that are in your budget and listen to examples if you can.
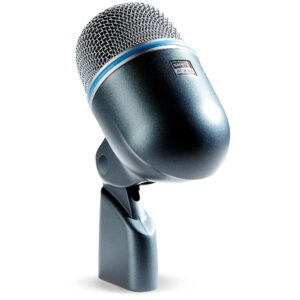
Shure Beta 52A

Some people will probably be shocked this one isn’t one of my favorites. There’s something this mic does in the midrange frequencies that I just don’t really care for. Again, it’s a taste thing. Music production is incredibly subjective. But it could sound exactly like what you want your kick to sound like, and that’s fine! Shure microphones are always excellent quality, I own several shure mics. In fact, a shure sm57 was the first mic I ever bought and it’s still kicking over 20 years later. The shure beta 52A is a great choice that many people use and love every day.
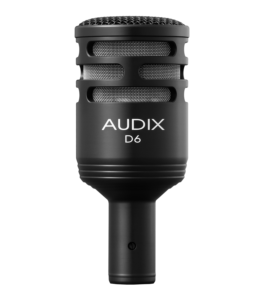
Shure beta 52a

Audix D6

Another well-liked mic that just wasn’t for me, but might be just what you’re looking for. This one has a heavily scooped midrange and hyped low end and high end. If you’re recording a more aggressive style of music like hard rock or metal that needs more emphasis on the attack of the beater hitting the batter head, then this one might be for you.

Audix D6

Should I just get a drum mic kit?

I see the appeal of just buying a box of mics to record your drums and being done with it, I do. But as nice as I’m sure some of those drum mic kits are, that’s not how I want to approach recording. Every mic has its own sound, its own way of coloring the source it’s recording. If I was building my mic collection from scratch today, I’d want to get the right mic for each drum. So, I don’t personally recommend mic kits.

What about subkick style mics?

Subkick mics are really just a large speaker mounted to some kind of stand and wired up to send signal like a microphone rather than playing back sound. The resulting sound is almost entirely low-end thump, really emphasizing the extreme low end sub frequencies. There are some manufacturers still making them and they’re pretty easy to DIY if you happen to have a large speaker lying around that you aren’t using. They’re fun, and if you’re blending them in with other traditional mics, you can get a good sound. But it can be easy to go overboard with the subkick and overwhelm the mix with too much low end and it will just sound muddy. Personally, I don’t think they’re needed if you get all of the stuff we’ve talked about so far right.

Bass Drum Mic Placement

Ok, now that you have your mic, where do you put it? Should you use just one mic? Two? More? There are no rules, just do what you must to get the sound you want for your music (context!)

I don’t think I’ve ever used more than two specifically for the bass drum, it seems a little excessive. The more mics you use, the more potential there is to run into phase problems. It’s tempting to stick a mic or two on every single element of the drum kit. That may end up being what you do, but it will take some work to get everything right. I think it’s better to start with a minimalist approach and augment that with additional mics as you see fit. I actually like to start with overhead mics (which I will get into in a future article) to get a picture of what the whole drum kit sounds like in the room, then start bringing in other mics to fill out the sound. But for the purposes of this article, we’ll just talk about bass drum mic placement.

Some tools to help

Before we start, I want to mention a couple other things I’ve written that can help you out here. I wrote a piece here about a trick I came up with while recording drums at home years ago. I just called it the delay trick. It’s a way to help you hear exactly what your mic is picking up while you’re positioning the mic. So if you’re recording at home or in some other non-studio environment, I think it’s worth a read. It’s a much shorter article than this one!

I also wrote this article on the merits of using a track sheet to keep track of different mic setups you try out while recording your drums. It helps you remember exactly what you did when you find that perfect drum mic setup.

On to the placements!

Now to get started. Now, I’ve mentioned context 9 times so far, so I hope it stuck. This is where you really need to keep that in mind. I think having reference songs ready during the recording phase is great, especially for beginners. But it’s not entirely necessary if you don’t want to. If you’re recording with a DAW (which most people are now) now’s a great time to use that metric ab plugin I mentioned earlier. Or just have a reference song or two on hand. Import them into the session and turn their gain down so their drums match the volume of your drums. Then just toggle back and forth to see if the drums you’re recording are sounding similar to the drum sound you’re hoping to capture.

One mic

So let’s start with one mic approaches. If your bass drum has a port hole in the resonant head, start with the mic barely inside the hole. The idea is to line up the diaphragm of the mic with the drum head. Give that a listen, keeping in mind how you want your bass drum to sound (context!). If you want the sound to be punchier, or have more of the click from the beater, then move the mic farther inside the drum, closer to the batter head. You may need to adjust the amount of dampening inside the drum once you have the mic in there. It takes some experimenting.

If you get the punch right, but the click of the beater isn’t quite what you’re looking for, you can try changing the beater to soften or harden the click to get the sound you want. You can also try turning the mic to face slightly away from the center of the batter head, it can act like turning down the higher frequencies and soften the click. Take the time to experiment with the placement and take notes on how each change sounds to you.

Adjust the mic to balance the attack and body of the drum

Alternatively, if you want a less aggressive bass drum sound, you can move the mic farther out of the bass drum and concentrate more on capturing the resonant head. Try moving your mic 1-2 inches back from the resonant head and down near the outer edge of the drum, maybe an inch or two from the ground. Search around that area and you may find a spot that has exactly the fat, low end thump you want. If this is the kind of sound you’re after, you’ll probably also want room mics for the whole kit. This will add to the overall bass drum sound.

If that still isn’t the sound you want, maybe it’s still too punchy for your stripped down acoustic song, you can try pulling the mic back even further to get more of a roomy sound to your kick. It could sound great, but you’re likely to get leakage from the rest of the kit in your mic. If you run into this, one thing you can try is to create a tent, or tunnel out of some stands and some thick blankets and drape it over both the mic and the bass drum. It’ll look kinda funky, but it will help tame some of those other sounds you don’t want getting in there. Particularly the higher frequencies from the cymbals.

The idea is to experiment with your one mic, doing whatever you can to get the sound you want.

Two mics

This is the method I find myself using more often than not. Use one mic close to the batter head, and another outside the drum on the resonant head. Then you blend the two sounds together to get your perfect blend of beater attack and low-end thump. It can work great, especially if the song you’re recording has dense, heavy parts and more sparse sections where you might want to change the sound of the bass drum in the mix. It will take a little more work to make sure the mics are complementing each other.

Get each mic to be about where you want them while listening individually, then find a good balance between them and make any further adjustments you may need to make to the mics from there while listening to all of the mics together. Taking the extra time to listen and adjust that way will be key to making this approach work.

An aggressive attack

If your drum doesn’t have a port hole and you want a more aggressive attack, try this. You can mic the resonant head, and experiment with micing the batter head outside the drum. Try to get it as close to the head as possible without being in the drummer’s way. You’re going to get leakage from the other drums, but keeping the mic close to the drum will help minimize it. You may want to experiment with mic choice here as well. You’ll get a very clear attack sound of the beater hitting the head from this angle, sometimes using a smaller diaphragm mic works well, especially since you’re getting the low end from the mic on the resonant head.

Again, make your adjustments while listening to all of the mics and take notes on what’s working. You might want to check in and compare your sound to some of your reference songs at this point too.

Other mics

The reason I mentioned I liked starting with overhead mics in the beginning of this section was because ALL of the mics on the drum kit contribute to the overall sound. Sure, you’ll probably have gates and expanders on some of the mics when it comes time to mix, but taking the time to get all of the mics working well together makes the mixing job much easier. You’ll hear the bass drum in the overhead mics and in room mics if you use them, and they help create a sense of width and depth and additional textures to the drums that you won’t get from the close mics. Just something to consider.

If you’re still looking for a little something extra for your sound, you can try other mics for added flavor. One fun thing is to take any available mic and just compress it to death. I usually have an extra sm57 around, or try some cheap mic you find on craigslist! Fast attack, maybe time the release to the tempo of the song, maybe faster, 10 db of compression or so, maybe more, experiment with it! Then try moving that mic around to different spots and just barely mix it in to the point where if you mute it, you notice it’s gone, but it’s not too prominent. Or try running the mic through a guitar pedal. Just something to bring a different sound to your drums.

Conclusion

So that’s it for the bass drum, thanks for sticking with me! To recap (TLDR), to improve the bass drum sound in your recordings, first you should think about the music you’re recording and how you want your drums to sound. Then you should consider the rooms you have available to you to record in and do what you can to improve the sound of the room. You’re going to want to select the best drums for the job you can. Use the right drum heads, tune them up, and dampen your drums. Then once you’re set up, choose the right mics for the job and start experimenting with placements.

Be sure to keep track of what you’re doing so you can remember what works and what doesn’t, it will help you quickly get great drum tones in the future. And remember to keep the context of the song in mind and compare your results to other recordings you like.

My next article will be on getting your snare to sound better in your recordings, so stay tuned!

About The Author

Hi! I’m Jon Lesher, a sound engineer in the San Francisco Bay Area. I got my start playing guitar with friends and playing in bands and I wanted to record what we were making. From there, I fell in love with music production, got a degree in recording arts, and started working in studios. I mostly do editing and mixing these days, but love sharing what I learned about recording to help my fellow musicians make better recordings! If you’d like to learn more about me, go to jonlesher.com.

Recording Drums At Home: The Delay Trick – 1 Fun Trick To Improve Your Drum Recordings

Recording Drums At Home: The Delay Trick

Sometimes, you have to record in situations that just aren’t ideal. Maybe you’re just getting started, recording bands in your basement, or recording your own band in your living room. Or in one fun case for me, bringing your nice gear out to a nice beach house to record some music away from the rest of the world. That was a fun few days!

While you absolutely can get a good quality recording in these kinds of spaces, it can be challenging. There will almost certainly be noise, little to no room treatment, neighbors who will hate you, time constraints to try to appease said neighbors. Recording in a nice studio with a control room and an engineer who knows the room and the equipment makes everything go so much smoother!

home drum recording

The Struggle

One such struggle I found was with recording drums. In an ideal world, you’d be in a nice studio, the mics roughly positioned in front of the kit, everything running through a nice board and outboard gear, and an assistant engineer to help you. You could listen to the drummer playing from the control room, while asking the 2nd engineer to move mics around in the studio, dialing in the perfect drum sound. And of course, taking notes in your track sheet so you can dial in that great tone the next time you’re in that studio.

But this article isn’t about that. No, this is for the band recording in their friends living room for the weekend. For the engineer trying to get their start recording drums in their parents' basement. Or for the seasoned pro with a nice remote recording rig looking for another trick.

My old approach was to set up my mics where I thought they would sound good. Then record a little bit, listen back, and decide I hated something, or worse, everything. Then I'd adjust mic positions and repeat until things sounded good enough. This would take a long time and would eat into our limited time for recording. And like lots of people just starting out, I ended up not being too thrilled with the sound later. Part of this was due to losing perspective, which deserves another article itself (reference tracks!). Another part was not being able to properly, and quickly, hear what my mic position changes were doing.

The Delay Trick:

That’s when I thought of a fun little trick. I placed a delay plugin on my drum bus, set it to 100% wet, and gave it a 2 second delay. Then, while the drummer and I were both wearing headphones, I’d then tell him to hit the snare once, for example. We’d hear it in the room, obviously. Then 2 seconds later in our headphones, we’d hear what the mics were picking up. This allowed me to quickly hear what the mics were hearing and allow me to make changes. Then hear the changes, and repeat until I was satisfied. Plus the drummer would then have fun playing with the delay for a bit, this is supposed to be fun, remember?

Trying to make adjustments in the room with headphones without the delay would never work right for me. I’d hear too much of the natural sound of the drums in front of me to hear what the mics were picking up in my headphones. But this little trick helped me start dialing in my drum tones much quicker than before. And I was happier with how they turned out in the end!

I hope this trick helps you start improving your drum recordings, just like it helped me. I’m planning on writing more articles on recording drums and maybe recording in general. So if you’re interested in reading those when they’re released, you can sign up for my mailing list below.

Hope to hear about your music soon!

Jon

thedrumeditor.com

Start Improving Your Drum Recording

About The Author

Hi! I'm Jon Lesher, a sound engineer in the San Francisco Bay Area. I got my start playing guitar with friends and playing in bands and I wanted to record what we were making. From there, I fell in love with music production, got a degree in recording arts in 2005, and started working in studios. I mostly do editing and mixing these days, but love sharing what I learned about recording to help my fellow musicians make better recordings! If you'd like to learn more about me, go to jonlesher.com.

Studio Track Sheet – One of the best ways to improve your recordings

Studio Track Sheet: The Best Way To Improve Your Recordings

Getting a great sounding drum recording is one of the most difficult things to accomplish in the recording studio. The artist, music producer, and sound engineer have so much to think about. There's drum selection, placement in the room, proper room treatment, drum mic selection, mic placement, phase relationships, preamp choice and settings, whether to record with compression or any other processing, what settings to use on those, do you use a click track, how loud is the headphone mix for the drummer, should you tell them to hit the cymbals a little softer, the variables are endless! And that's just on the recording side for one song. What if that setup doesn't sound great on another type of song?

This isn't a post about what to do about any of these things. You can check out the first part of my drum recording guide here if that's what you need. I intend to write some more in the near future, and will update this post when I do, but the truth is the internet is full of different approaches and opinions. What works for one person may not work for another. The fun part about being a sound engineer is taking the time to experiment and find what does work for you.

Enter The Recording Studio Track Sheet:

track sheet

For decades, recording studios have used a track sheet when running recording sessions. They're an excellent way to not only help keep things organized, but to also give you the ability to quickly recall your exact settings, mic placements, selections, and whatever else you include in the notes on your sheet. The more details you include, the better!

So if you record some drums for a song and decide you didn't like how the snare sounded by the time you get to the mixing stage, you can refer back to the track sheet on your next session and make adjustments. Or if you really liked the kick sound you got, you can now duplicate what you did on all future sessions. All you have to do is just look at your sheet and copy your settings.

There's a saying, "what gets measured gets managed." So the best way to improve your recordings, is to do a recording and write down what you did. Then you can learn from mistakes and build on your successes.

I've made my own studio track sheet here and would like to share it with you. Just let me know where to email it and it's all yours. I'm including a google sheets version of it that you can make copies of and keep with your session files. I'm also including a pdf version for those of you who prefer to have physical copies you can write on. I hope this helps you get some great recordings! Then when it's time to edit your drums, send me a message and I'll help you make your drums shine!

Start Improving Your Drum Recording With A Track Sheet!

About The Author

Hi! I'm Jon Lesher, a sound engineer in the San Francisco Bay Area. I got my start playing guitar with friends and playing in bands and I wanted to record what we were making. From there, I fell in love with music production, got a degree in recording arts in 2005 , and started working in studios. I mostly do editing and mixing these days, but love sharing what I learned about recording to help my fellow musicians make better recordings! If you'd like to learn more about me, go to jonlesher.com.

Scroll to top